Custom Object Detection: Training and Inference
ImageAI provides the simple and powerful approach to training custom object detection models using the YOLOv3 architeture. This allows you to train your own model on any set of images that corresponds to any type of object of interest.
You can use your trained detection models to detect objects in images, videos and perform video analysis.
======= imageai.Detection.Custom.DetectionModelTrainer =======
This is the Detection Model training class, which allows you to train object detection models on image datasets that are in YOLO annotation format, using the YOLOv3 and TinyYOLOv3 model. The training process generates a JSON file that maps the objects names in your image dataset and the detection anchors, as well as creates lots of models.
To get started, you need prepare your dataset in the YOLO annotation format and organize it as detailed below:
– Decide the type of object(s) you want to detect and collect about 200 (minimum recommendation) or more picture of each of the object(s)
– Once you have collected the images, you need to annotate the object(s) in the images. You can use a tool like LabelIMG to generate the annotations for your images.
– Once you have the annotations for all your images, create a folder for your dataset (E.g headsets) and in this parent folder, create child folders train and validation
– In the train folder, create images and annotations sub-folders. Put about 70-80% of your dataset of each object’s images in the images folder and put the corresponding annotations for these images in the annotations folder.
– In the validation folder, create images and annotations sub-folders. Put the rest of your dataset images in the images folder and put the corresponding annotations for these images in the annotations folder.
– Once you have done this, the structure of your image dataset folder should look like below:
>> train    >> images       >> img_1.jpg  (shows Object_1)
            >> images       >> img_2.jpg  (shows Object_2)
            >> images       >> img_3.jpg  (shows Object_1, Object_3 and Object_n)
            >> annotations  >> img_1.txt  (describes Object_1)
            >> annotations  >> img_2.txt (describes Object_2)
            >> annotations  >> img_3.txt  (describes Object_1, Object_3 and Object_n)

>> validation   >> images       >> img_151.jpg (shows Object_1, Object_3 and Object_n)
                >> images       >> img_152.jpg (shows Object_2)
                >> images       >> img_153.jpg (shows Object_1)
                >> annotations  >> img_151.txt (describes Object_1, Object_3 and Object_n)
                >> annotations  >> img_152.txt (describes Object_2)
                >> annotations  >> img_153.txt (describes Object_1)
- You can train your custom detection model completely from scratch or use transfer learning (recommended for better accuracy) from a pre-trained YOLOv3 model or TinyYOLOv3. Also, we have provided a sample annotated Hololens and Headsets (Hololens and Oculus) dataset for you to train with. Download the pre-trained YOLOv3 or TinyYOLOv3 model and the sample dataset.
Below is the code to train new detection models on your dataset:
from imageai.Detection.Custom import DetectionModelTrainer

trainer = DetectionModelTrainer()
trainer.setModelTypeAsYOLOv3()
trainer.setDataDirectory(data_directory="hololens")
trainer.setTrainConfig(object_names_array=["hololens"], batch_size=4, num_experiments=200, train_from_pretrained_model="yolov3.pt")
trainer.trainModel()
In the first 2 lines, we imported the DetectionModelTrainer class and created an instance of it
from imageai.Detection.Custom import DetectionModelTrainer

trainer = DetectionModelTrainer()
Then we called the following functions
.setModelTypeAsYOLOv3() , This function sets the model type of the object detection training instance to the YOLOv3 model:
trainer.setModelTypeAsYOLOv3()
.trainer.setDataDirectory() , This function is sets the path to your dataset’s folder:
trainer.setDataDirectory()
– parameter data_directory (required) : This is the path to your dataset folder.
.trainer.setTrainConfig() , This function sets the properties for the training instances:
trainer.setTrainConfig()
– parameter object_names_array (required) : This is a list of the names of all the different objects in your dataset.
– parameter batch_size (optional) : This is the batch size for the training instance.
– parameter num_experiments (required) : Also known as epochs, it is the number of times the network will train on all the training.
– parameter train_from_pretrained_model (optional) : This is used to perform transfer learning by specifying the path to a pre-trained YOLOv3 model
When you run the training code, ImageAI will perform the following actions:
- generate a .json in the dataset_folder/json folder. Please note that the JSON file generated in a training session can only be used with the detection models saved in the training session.
- saves new models n the dataset_folder/models folder as the training loss reduces.
As the training progresses, the information displayed in the terminal will look similar to the sample below:
Generating anchor boxes for training images...
thr=0.25: 1.0000 best possible recall, 6.93 anchors past thr
n=9, img_size=416, metric_all=0.463/0.856-mean/best, past_thr=0.549-mean:
====================
Pretrained YOLOv3 model loaded to initialize weights
====================
Epoch 1/100
----------
Train:
30it [00:14,  2.09it/s]
    box loss-> 0.09820, object loss-> 0.27985, class loss-> 0.00000
Validation:
15it [01:45,  7.05s/it]
    recall: 0.085714 precision: 0.000364 mAP@0.5: 0.000186, mAP@0.5-0.95: 0.000030

Epoch 2/100
----------
Train:
30it [00:07,  4.25it/s]
    box loss-> 0.08691, object loss-> 0.07011, class loss-> 0.00000
Validation:
15it [01:37,  6.53s/it]
    recall: 0.214286 precision: 0.000854 mAP@0.5: 0.000516, mAP@0.5-0.95: 0.000111
For each increase in the mAP0.5 after an experiment, a model is saved in the hololens-yolo/models folder. The higher the mAP0.5, the better the model.
======= imageai.Detection.Custom.CustomObjectDetection =======
CustomObjectDetection class provides very convenient and powerful methods to perform object detection on images and extract each object from the image using your own custom YOLOv3 model and the corresponding .json generated during the training.
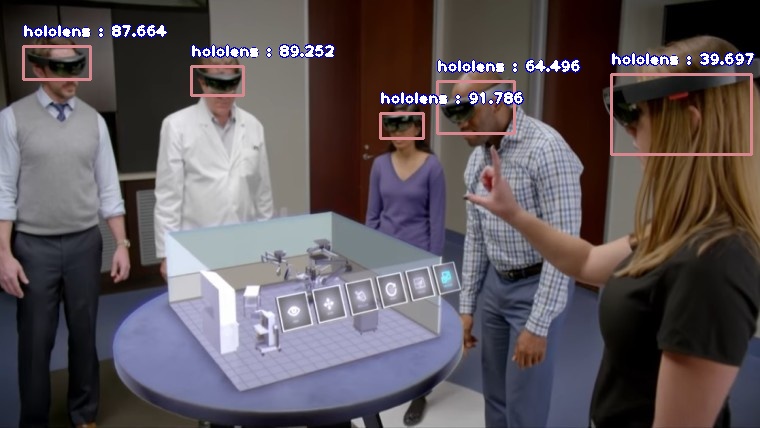
To test the custom object detection, you can download a sample custom model we have trained to detect the Hololens headset and its detection_config.json file via the links below:
- Sample Image
Once you download the custom object detection model file, you should copy the model file to the your project folder where your .py files will be. Then create a python file and give it a name; an example is FirstCustomDetection.py. Then write the code below into the python file:
from imageai.Detection.Custom import CustomObjectDetection

detector = CustomObjectDetection()
detector.setModelTypeAsYOLOv3()
detector.setModelPath("yolov3_hololens-yolo_mAP-0.82726_epoch-73.pt")
detector.setJsonPath("hololens-yolo_yolov3_detection_config.json")
detector.loadModel()
detections = detector.detectObjectsFromImage(input_image="holo1.jpg", output_image_path="holo1-detected.jpg")
for detection in detections:
    print(detection["name"], " : ", detection["percentage_probability"], " : ", detection["box_points"])
When you run the code, it will produce a result similar to the one below:
hololens  :  39.69653248786926  :  [611, 74, 751, 154]
hololens  :  87.6643180847168  :  [23, 46, 90, 79]
hololens  :  89.25175070762634  :  [191, 66, 243, 95]
hololens  :  64.49641585350037  :  [437, 81, 514, 133]
hololens  :  91.78624749183655  :  [380, 113, 423, 138]
See more details below:
.setModelTypeAsYOLOv3() , This specifies that you are using a trained YOLOv3 model
detector.setModelTypeAsYOLOv3()
.setModelPath() , This is used to set the file path to your trained model
detector.setModelPath()
– parameter model_path (required) : This is path to your model file
.setJsonPath() , This is used to set the file path to your configuration json file
detector.setJsonPath()
– parameter configuration_json (required) : This is path to .json file
.loadModel() , This is load the detection model:
detector.loadModel()
.detectObjectsFromImage() , This is the function that performs object detection task after the model as loaded. It can be called many times to detect objects in any number of images. Find example code below:
detections = detector.detectObjectsFromImage(input_image="image.jpg", output_image_path="imagenew.jpg", minimum_percentage_probability=30)
– parameter input_image (required) : This refers to the path to image file which you want to detect. You can set this parameter to the Numpy array of File stream of any image if you set the paramter input_type to “array” or “stream”
—parameter output_image_path (required only if input_type = “file” ) : This refers to the file path to which the detected image will be saved. It is required only if input_type = “file”
– parameter minimum_percentage_probability (optional ) : This parameter is used to determine the integrity of the detection results. Lowering the value shows more objects while increasing the value ensures objects with the highest accuracy are detected. The default value is 50.
—parameter output_type (optional ) : This parameter is used to set the format in which the detected image will be produced. The available values are “file” and “array”. The default value is “file”. If this parameter is set to “array”, the function will return a Numpy array of the detected image. See sample below
—parameter display_percentage_probability (optional ) : This parameter can be used to hide the percentage probability of each object detected in the detected image if set to False. The default values is True.
– parameter display_object_name (optional ) : This parameter can be used to hide the name of each object detected in the detected image if set to False. The default values is True.
—parameter extract_detected_objects (optional ) : This parameter can be used to extract and save/return each object detected in an image as a seperate image. The default values is False.
– returns : The returned values will depend on the parameters parsed into the detectObjectsFromImage() function. See the comments and code below
.useCPU() , This function loads the model in CPU and forces processes to be done on the CPU. This is because by default, ImageAI will use GPU/CUDA if available else default to CPU. Find example code:
detector.useCPU()
======= imageai.Detection.Custom.CustomVideoObjectDetection =======
CustomVideoObjectDetection class provides very convenient and powerful methods to perform object detection on videos and obtain analytical from the video, using your own custom YOLOv3 model and the corresponding detection_config.json generated during the training.
To test the custom object detection, you can download a sample custom model we have trained to detect the Hololens headset and its detection_config.json file via the links below:
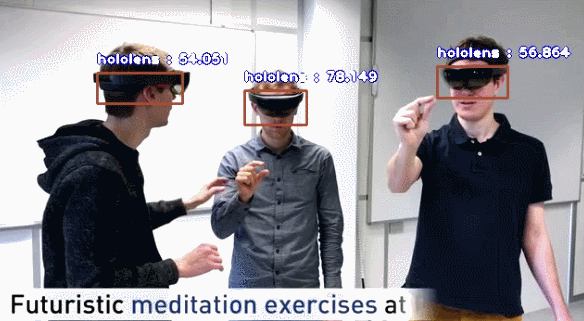
Download a sample video of the Hololens in the link below.
Then run the code below in the video:
from imageai.Detection.Custom import CustomVideoObjectDetection
import os

execution_path = os.getcwd()

video_detector = CustomVideoObjectDetection()
video_detector.setModelTypeAsYOLOv3()
video_detector.setModelPath("yolov3_hololens-yolo_mAP-0.82726_epoch-73.pt")
video_detector.setJsonPath("hololens-yolo_yolov3_detection_config.json")
video_detector.loadModel()

video_detector.detectObjectsFromVideo(input_file_path="holo1.mp4",
                                        output_file_path=os.path.join(execution_path, "holo1-detected"),
                                        frames_per_second=30,
                                        minimum_percentage_probability=40,
                                        log_progress=True)
See details on the available functions below
.setModelTypeAsYOLOv3() , This specifies that you are using a trained YOLOv3 model
video_detector.setModelTypeAsYOLOv3()
.setModelPath() , This is used to set the file path to your trained model
video_detector.setModelPath()
– parameter model_path (required) : This is path to your model file
.setJsonPath() , This is used to set the file path to your configuration json file
video_detector.setJsonPath()
– parameter configuration_json (required) : This is path to detection_json file
.loadModel() , This is load the detection model:
video_detector.loadModel()
.useCPU() , This function loads the model in CPU and forces processes to be done on the CPU. This is because by default, ImageAI will use GPU/CUDA if available else default to CPU. Find example code:
video_detector.useCPU()
.detectObjectsFromVideo() , This is the function that performs object detecttion on a video file or video live-feed after the model has been loaded into the instance you created. Find a full sample code below:
– parameter input_file_path (required if you did not set camera_input) : This refers to the path to the video file you want to detect.
—parameter output_file_path (required if you did not set save_detected_video = False) : This refers to the path to which the detected video will be saved. By default, this functionsaves video .avi format.
– parameter frames_per_second (optional , but recommended) : This parameters allows you to set your desired frames per second for the detected video that will be saved. The default value is 20 but we recommend you set the value that suits your video or camera live-feed.
—parameter log_progress (optional) : Setting this parameter to True shows the progress of the video or live-feed as it is detected in the CLI. It will report every frame detected as it progresses. The default value is False.
– parameter return_detected_frame (optional) : This parameter allows you to return the detected frame as a Numpy array at every frame, second and minute of the video detected. The returned Numpy array will be parsed into the respective per_frame_function, per_second_function and per_minute_function (See details below)
—parameter camera_input (optional) : This parameter can be set in replacement of the input_file_path if you want to detect objects in the live-feed of a camera. All you need is to load the camera with OpenCV’s VideoCapture() function and parse the object into this parameter.
– parameter minimum_percentage_probability (optional ) : This parameter is used to determine the integrity of the detection results. Lowering the value shows more objects while increasing the value ensures objects with the highest accuracy are detected. The default value is 50.
—parameter display_percentage_probability (optional ) : This parameter can be used to hide the percentage probability of each object detected in the detected video if set to False. The default values is True.
– parameter display_object_name (optional ) : This parameter can be used to hide the name of each object detected in the detected video if set to False. The default values is True.
—parameter save_detected_video (optional ) : This parameter can be used to or not to save the detected video or not to save it. It is set to True by default.
– parameter per_frame_function (optional ) : This parameter allows you to parse in the name of a function you define. Then, for every frame of the video that is detected, the function will be parsed into the parameter will be executed and and analytical data of the video will be parsed into the function. The data returned can be visualized or saved in a NoSQL database for future processing and visualization.
See a sample function for this parameter below .. code-block:
This parameter allows you to parse in a function you will want to execute after each frame of the video is detected. If this parameter is set to a function, after every video frame is detected, the function will be executed with the following values parsed into it: -- position number of the frame -- an array of dictinaries, with each dictinary corresponding to each object detected. Each dictionary contains 'name', 'percentage_probability' and 'box_points' -- a dictionary with with keys being the name of each unique objects and value are the number of instances of each of the objects present -- If return_detected_frame is set to True, the numpy array of the detected frame will be parsed as the fourth value into the function """ def forFrame(frame_number, output_array, output_count): print("FOR FRAME " , frame_number) print("Output for each object : ", output_array) print("Output count for unique objects : ", output_count) print("------------END OF A FRAME --------------")—parameter per_second_function (optional ) : This parameter allows you to parse in the name of a function you define. Then, for every second of the video that is detected, the function will be parsed into the parameter will be executed and analytical data of the video will be parsed into the function. The data returned can be visualized or saved in a NoSQL database for future processing and visualization.
See a sample function for this parameter below .. code-block:
This parameter allows you to parse in a function you will want to execute after each second of the video is detected. If this parameter is set to a function, after every second of a video is detected, the function will be executed with the following values parsed into it: -- position number of the second -- an array of dictionaries whose keys are position number of each frame present in the last second , and the value for each key is the array for each frame that contains the dictionaries for each object detected in the frame -- an array of dictionaries, with each dictionary corresponding to each frame in the past second, and the keys of each dictionary are the name of the number of unique objects detected in each frame, and the key values are the number of instances of the objects found in the frame -- a dictionary with its keys being the name of each unique object detected throughout the past second, and the key values are the average number of instances of the object found in all the frames contained in the past second -- If return_detected_frame is set to True, the numpy array of the detected frame will be parsed as the fifth value into the function def forSeconds(second_number, output_arrays, count_arrays, average_output_count): print("SECOND : ", second_number) print("Array for the outputs of each frame ", output_arrays) print("Array for output count for unique objects in each frame : ", count_arrays) print("Output average count for unique objects in the last second: ", average_output_count) print("------------END OF A SECOND --------------")—parameter per_minute_function (optional ) : This parameter allows you to parse in the name of a function you define. Then, for every frame of the video that is detected, the function which was parsed into the parameter will be executed and analytical data of the video will be parsed into the function. The data returned has the same nature as the per_second_function ; the difference is that it covers all the frames in the past 1 minute of the video.
See a sample function for this parameter below .. code-block:
def forMinute(minute_number, output_arrays, count_arrays, average_output_count): print("MINUTE : ", minute_number) print("Array for the outputs of each frame ", output_arrays) print("Array for output count for unique objects in each frame : ", count_arrays) print("Output average count for unique objects in the last minute: ", average_output_count) print("------------END OF A MINUTE --------------")—parameter video_complete_function (optional ) : This parameter allows you to parse in the name of a function you define. Once all the frames in the video is fully detected, the function will was parsed into the parameter will be executed and analytical data of the video will be parsed into the function. The data returned has the same nature as the per_second_function and per_minute_function ; the differences are that no index will be returned and it covers all the frames in the entire video.
See a sample funtion for this parameter below .. code-block:
def forFull(output_arrays, count_arrays, average_output_count): print("Array for the outputs of each frame ", output_arrays) print("Array for output count for unique objects in each frame : ", count_arrays) print("Output average count for unique objects in the entire video: ", average_output_count) print("------------END OF THE VIDEO --------------")—parameter detection_timeout (optional) : This function allows you to state the number of seconds of a video that should be detected after which the detection function stop processing the video.