Detection Classes
ImageAI provides very powerful yet easy to use classes and functions to perform Image Object Detection and Extraction.
ImageAI allows you to perform all of these with state-of-the-art deep learning algorithms like RetinaNet, YOLOv3 and TinyYOLOv3. With ImageAI you can run detection tasks and analyse images.
Find below the classes and their respective functions available for you to use. These classes can be integrated into any traditional python program you are developing, be it a website, Windows/Linux/MacOS application or a system that supports or part of a Local-Area-Network.
======= imageai.Detection.ObjectDetection =======
This ObjectDetection class provides you function to perform object detection on any image or set of images, using pre-trained models that was trained on the COCO dataset. The models supported are RetinaNet, YOLOv3 and TinyYOLOv3. This means you can detect and recognize 80 different kind of common everyday objects. To get started, download any of the pre-trained model that you want to use via the links below.
Download RetinaNet Model - retinanet_resnet50_fpn_coco-eeacb38b.pth
Download YOLOv3 Model - yolov3.pt
Download TinyYOLOv3 Model - tiny-yolov3.pt
Once you have downloaded the model of your choice, you should create a new instance of the ObjectDetection class as seen in the sample below:
from imageai.Detection import ObjectDetection

detector = ObjectDetection()
Once you have created an instance of the class, you can use the functions below to set your instance property and start detecting objects in images.
.setModelTypeAsRetinaNet() , This function sets the model type of the object detection instance you created to the RetinaNet model, which means you will be performing your object detection tasks using the pre-trained “RetinaNet” model you downloaded from the links above. Find example code below:
detector.setModelTypeAsRetinaNet()
.setModelTypeAsYOLOv3() , This function sets the model type of the object detection instance you created to the YOLOv3 model, which means you will be performing your object detection tasks using the pre-trained “YOLOv3” model you downloaded from the links above. Find example code below:
detector.setModelTypeAsYOLOv3()
.setModelTypeAsTinyYOLOv3() , This function sets the model type of the object detection instance you created to the TinyYOLOv3 model, which means you will be performing your object detection tasks using the pre-trained “TinyYOLOv3” model you downloaded from the links above. Find example code below:
detector.setModelTypeAsTinyYOLOv3()
.setModelPath() , This function accepts a string which must be the path to the model file you downloaded and must corresponds to the model type you set for your object detection instance. Find example code,and parameters of the function below:
detector.setModelPath("yolov3.pt")
– parameter model_path (required) : This is the path to your downloaded model file.
.loadModel() , This function loads the model from the path you specified in the function call above into your object detection instance. Find example code below:
detector.loadModel()
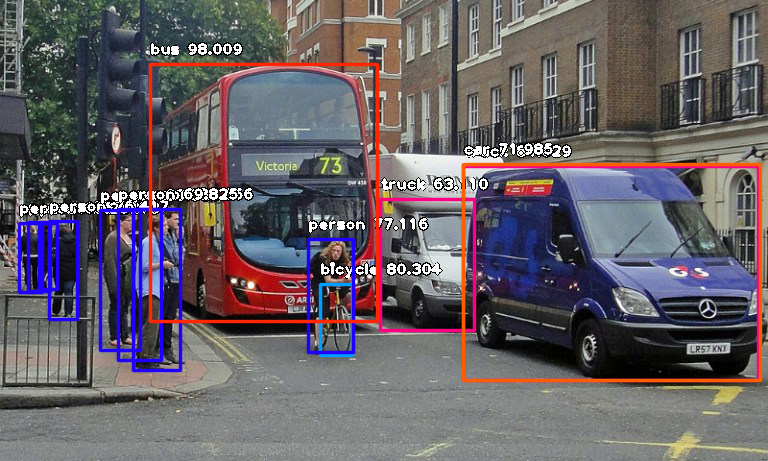
.detectObjectsFromImage() , This is the function that performs object detection task after the model as loaded. It can be called many times to detect objects in any number of images. Find example code below:
detections = detector.detectObjectsFromImage(input_image="image.jpg", output_image_path="imagenew.jpg", minimum_percentage_probability=30)
– parameter input_image (required) : This refers to the path to image file which you want to detect. You can set this parameter to the Numpy array of File stream of any image if you set the paramter input_type to “array” or “stream”
—parameter output_image_path (required only if input_type = “file” ) : This refers to the file path to which the detected image will be saved. It is required only if input_type = “file”
– parameter minimum_percentage_probability (optional ) : This parameter is used to determine the integrity of the detection results. Lowering the value shows more objects while increasing the value ensures objects with the highest accuracy are detected. The default value is 50.
—parameter output_type (optional ) : This parameter is used to set the format in which the detected image will be produced. The available values are “file” and “array”. The default value is “file”. If this parameter is set to “array”, the function will return a Numpy array of the detected image. See sample below::
returned_image, detections = detector.detectObjectsFromImage(input_image=”image.jpg”, output_type=”array”, minimum_percentage_probability=30)—parameter display_percentage_probability (optional ) : This parameter can be used to hide the percentage probability of each object detected in the detected image if set to False. The default values is True.
– parameter display_object_name (optional ) : This parameter can be used to hide the name of each object detected in the detected image if set to False. The default values is True.
—parameter extract_detected_objects (optional ) : This parameter can be used to extract and save/return each object detected in an image as a seperate image. The default values is False.
– returns : The returned values will depend on the parameters parsed into the detectObjectsFromImage() function. See the comments and code below
"""
If all required parameters are set and 'output_image_path' is set to a file path you want the detected image to be saved, the function will return:

1. an array of dictionaries, with each dictionary corresponding to the objects
    detected in the image. Each dictionary contains the following property:
        * name (string)
        * percentage_probability (float)
        * box_points (tuple of x1,y1,x2 and y2 coordinates)
"""
detections = detector.detectObjectsFromImage(input_image="image.jpg", output_image_path="imagenew.jpg", minimum_percentage_probability=30)
""" If all required parameters are set and output_type = 'array' ,the function will return 1. a numpy array of the detected image 2. an array of dictionaries, with each dictionary corresponding to the objects detected in the image. Each dictionary contains the following property: * name (string) * percentage_probability (float) * box_points (list of x1,y1,x2 and y2 coordinates) """ returned_image, detections = detector.detectObjectsFromImage(input_image="image.jpg", output_type="array", minimum_percentage_probability=30)""" If extract_detected_objects = True and 'output_image_path' is set to a file path you want the detected image to be saved, the function will return: 1. an array of dictionaries, with each dictionary corresponding to the objects detected in the image. Each dictionary contains the following property: * name (string) * percentage_probability (float) * box_points (list of x1,y1,x2 and y2 coordinates) 2. an array of string paths to the image of each object extracted from the image """ detections, extracted_objects = detector.detectObjectsFromImage(input_image="image.jpg", output_image_path="imagenew.jpg", extract_detected_objects=True, minimum_percentage_probability=30)""" If extract_detected_objects = True and output_type = 'array', the the function will return: 1. a numpy array of the detected image 2. an array of dictionaries, with each dictionary corresponding to the objects detected in the image. Each dictionary contains the following property: * name (string) * percentage_probability (float) * box_points (list of x1,y1,x2 and y2 coordinates) 3. an array of numpy arrays of each object detected in the image """ returned_image, detections, extracted_objects = detector.detectObjectsFromImage(input_image="image.jpg", output_type="array", extract_detected_objects=True, minimum_percentage_probability=30)
.useCPU() , This function loads the model in CPU and forces processes to be done on the CPU. This is because by default, ImageAI will use GPU/CUDA if available else default to CPU. Find example code:
detector.useCPU()
.CustomObjects() , This function is used when you want to detect only a selected number of objects. It returns a dictionary of objects and their True or False values. To detect selected objects in an image, you will have to use the dictionary returned by the this function with the detectCustomObjectsFromImage() function. Find the details in the comment and code sample below:
"""
There are 80 possible objects that you can detect with the
ObjectDetection class, and they are as seen below.

    person,   bicycle,   car,   motorcycle,   airplane,
    bus,   train,   truck,   boat,   traffic light,   fire hydrant,   stop_sign,
    parking meter,   bench,   bird,   cat,   dog,   horse,   sheep,   cow,   elephant,   bear,   zebra,
    giraffe,   backpack,   umbrella,   handbag,   tie,   suitcase,   frisbee,   skis,   snowboard,
    sports ball,   kite,   baseball bat,   baseball glove,   skateboard,   surfboard,   tennis racket,
    bottle,   wine glass,   cup,   fork,   knife,   spoon,   bowl,   banana,   apple,   sandwich,   orange,
    broccoli,   carrot,   hot dog,   pizza,   donot,   cake,   chair,   couch,   potted plant,   bed,
    dining table,   toilet,   tv,   laptop,   mouse,   remote,   keyboard,   cell phone,   microwave,
    oven,   toaster,   sink,   refrigerator,   book,   clock,   vase,   scissors,   teddy bear,   hair dryer,
    toothbrush.

To detect only some of the objects above, you will need to call the CustomObjects function and set the name of the
object(s) yiu want to detect to through. The rest are False by default. In below example, we detected only chose detect only person and dog.
"""
custom = detector.CustomObjects(person=True, dog=True)
.detectCustomObjectsFromImage(), This function have all the parameters and returns all the values the detectObjectsFromImage() functions does but a slight difference. This function let detect only selected objects in an image. Unlike the normal detectObjectsFromImage() function, this needs an extra parameter which is “custom_object” which accepts the dictionary returned by the CustomObjects() function. In the sample below, we set the detection funtion to report only detections on persons and dogs:
custom = detector.CustomObjects(person=True, dog=True)

detections = detector.detectCustomObjectsFromImage( custom_objects=custom, input_image=os.path.join(execution_path , "image3.jpg"), output_image_path=os.path.join(execution_path , "image3new-custom.jpg"), minimum_percentage_probability=30)
Sample Image Object Detection code
Find below a code sample for detecting objects in an image:
from imageai.Detection import ObjectDetection
import os

execution_path = os.getcwd()

detector = ObjectDetection()
detector.setModelTypeAsYOLOv3()
detector.setModelPath( os.path.join(execution_path , "yolov3.pt"))
detector.loadModel()
detections = detector.detectObjectsFromImage(input_image=os.path.join(execution_path , "image.jpg"), output_image_path=os.path.join(execution_path , "imagenew.jpg"), minimum_percentage_probability=30)

for eachObject in detections:
    print(eachObject["name"] , " : ", eachObject["percentage_probability"], " : ", eachObject["box_points"] )
    print("--------------------------------")